TL;DR
In this post, I will explain step-by-step how you can build and deploy a containerized Wordpress to Amazon ECS (Elastic Container Service) and connect it to TiDB Serverless, a managed database solution that provide a quite generous free-tier with both good performance and resilient considered. And you even gain extra benefits for free, such as PITR, private link and observability (O11y) features, just name a few.
Table of contents
Open Table of contents
Why
Frameworks like Wordpress or Django remain popular as they are established market proven solutions with huge communities and also give you a lot of flexibility for customization as your business grows.
However, the traditional way of hosting Wordpress is to use a LAMP or similar stack. This approach is not only hard to scale, but also hard to maintain. For example, you need to manually patch the OS and the software, and you need to manually scale the database and the web server. And if you want to migrate to a new server, you need to manually migrate the database and the files.
Remember we are in the cloud computing era and the container is the new standard for application packaging and deployment. So why not containerize Wordpress and deploy it to a managed container service? This way, you can easily scale the application, and you can easily migrate the application to a new server.
The Architecture
Our architecture is mostly a simplified version of AWS Reference Architecture for Wordpress with a few differences:
- Wordpress is hosted on Amazon ECS and AWS Fargate instead of Amazon EC2.
- TiDB Serverless is used as relational database as a replacement of Amazon Aurora MySQL. With that, the entire stack you can get it for free!
- Only HTTP endpoint is deployed now for the sake of simplification. Using HTTPS will be provided in my future posts.
Some thoughts behind these architecture changes:
- We want to use containers for easier infrastructure setup and service compartmentization. With AWS Copilot CLI, you can construct your containerized solution with good DevOps practices in place.
- Before I see my service usage grow, I want to use cost-effective solutions to quickly validate my ideas. But it can also be able to scale quickly and easily. This is how the TiDB Serverless comes to play.
And you can image such architecture can be easily extended to deploy other similar open source SaaS solutions.
Prerequisites
First of all, you need to register for both AWS and TiDB Cloud to use the services.
- AWS Free Tier - everybody knows what it is :)
- TiDB Serverless - a fully-managed Database-as-a-Service (DBaaS) that is rooted from TiDB, an open source, high performance, MySQL compatible hybrid transactional/analytical processing (HTAP) database.
Create TiDB Serverless cluster
Follow these steps here to create the cluster. TiDB Serverless provides 5GiB of storage, and 50 million Request Units (RUs) available for free each month.
Install required tools locally
To operate on AWS, we will pimarily use the command line tools. Make sure you have those tools and utilities installed properly on your local machine:
- Docker desktop - The local Docker runtime required by AWS Copilot. Download and install based on the OS your machine has.
- AWS CLI - The AWS Command Line Interface (AWS CLI) is used to interact with AWS services using commands in your command-line shell. AWS Copilot CLI requires it to log into the AWS to get the account and region information.
- AWS Copilot CLI - AWS Copilot is a command line tool that makes it easy for developers to build, release, and operate production ready containerized applications on AWS App Runner, Amazon ECS, and AWS Fargate. This will be our major command line tool use for this post.
Let’s get started!
A list of key steps we will go through:
- Configure AWS CLI
- Set up AWS Copilot application and environment
- Create your front-end Wordpress service
- Set up your database for Wordpress
- Deploy your Wordpress container
- Give a dry run!
- (Bonus) Use AWS PrivateLink connect to TiDB Cloud Serverless
The whole steps starting from scratch will take about 30 minutes. If you want to save some time by copy and paste the code snippet in the steps below, clone this repository to start with:
git clone https://github.com/likidu/tidb-wordpress-aws-copilot.git && cd tidb-wordpress-aws-copilotConfigure AWS CLI
AWS Copilot CLI relies on AWS CLI to be configured with access keys.
-
Grab your AWS account access ID and key. Log into the AWS Management Console, go to IAM > Users, select the account you are using and find the access ID and key from:

-
Launch your command-line shell and run the command to configure your AWS account interactively:
aws configureAWS Access Key ID [****************72IE]: Your Access Key ID AWS Secret Access Key [****************Ixas]: Your Access Key Default region name [us-west-2]: Matches to your TiDB Serverless cluster region Default output format [json]:The Default region name should match the region of your TiDB Cloud Serverless cluster you created in the prerequisite step.
Hooray! We have all the accounts and tools we need. Let’s dive right in!
Set up AWS Copilot application and environment
-
Start from a fresh empty directory. Initialize a git repository:
git init -
Initialize a new Copilot application. An application is a collection of environments which run your ECS services.
copilot app init tidb-wordpressThe Copilot will generate and push CloudFormation and IAM settings to AWS.
-
Initialize the environment. An environment is a collection of networking resources including a VPC, public and private subnets, an ECS Cluster, and (when necessary) an Application Load Balancer to serve traffic to your containers. Creating an environment is a prerequisite to deploying a service with Copilot.
copilot env init --name test --default-config --profile defaultHere you are creating a local
testenvironment. You can imagine during development, you can create multiple environments also likeprodfor your DevOps workflow. -
Deploy the environment to AWS.
copilot env deploy --name test
Create your front-end Wordpress service
-
Create a Dockerfile with the following content.
FROM public.ecr.aws/bitnami/wordpress-nginx:latest as app
EXPOSE 8080

COPY startup.sh /opt/copilot/scripts/startup.sh

ENTRYPOINT ["/bin/sh", "-c"]
CMD ["/opt/copilot/scripts/startup.sh"]
As you can figure out, you will also need the
startup.shscript mentioned in the Dockerfile that wraps the startup logic.#!/bin/bash echo "Preparing patching wp-config.php ..." WP_CONFIG_PATH="/bitnami/wordpress/wp-config.php" sed -i "s/define( 'DB_COLLATE', '' );/define( 'DB_COLLATE', 'utf8mb4_bin' );/g" $WP_CONFIG_PATH /opt/bitnami/scripts/wordpress/entrypoint.sh /opt/bitnami/scripts/nginx-php-fpm/run.shThis script is used to patch the
wp-config.phpfile to useutf8mb4_binas the database collation. This is required for TiDB Serverless to work properly. -
Don’t forget to add write access to your
startup.sh. That Docker can then execute it correctly.chmod +x ./startup.sh -
Then register a new service with Copilot. It will write a manifest file at
copilot/fe/manifest.ymllaying out configuration for your service.copilot svc init -t "Load Balanced Web Service" --dockerfile ./Dockerfile --port 8080 --name fe
Set up your database for Wordpress
-
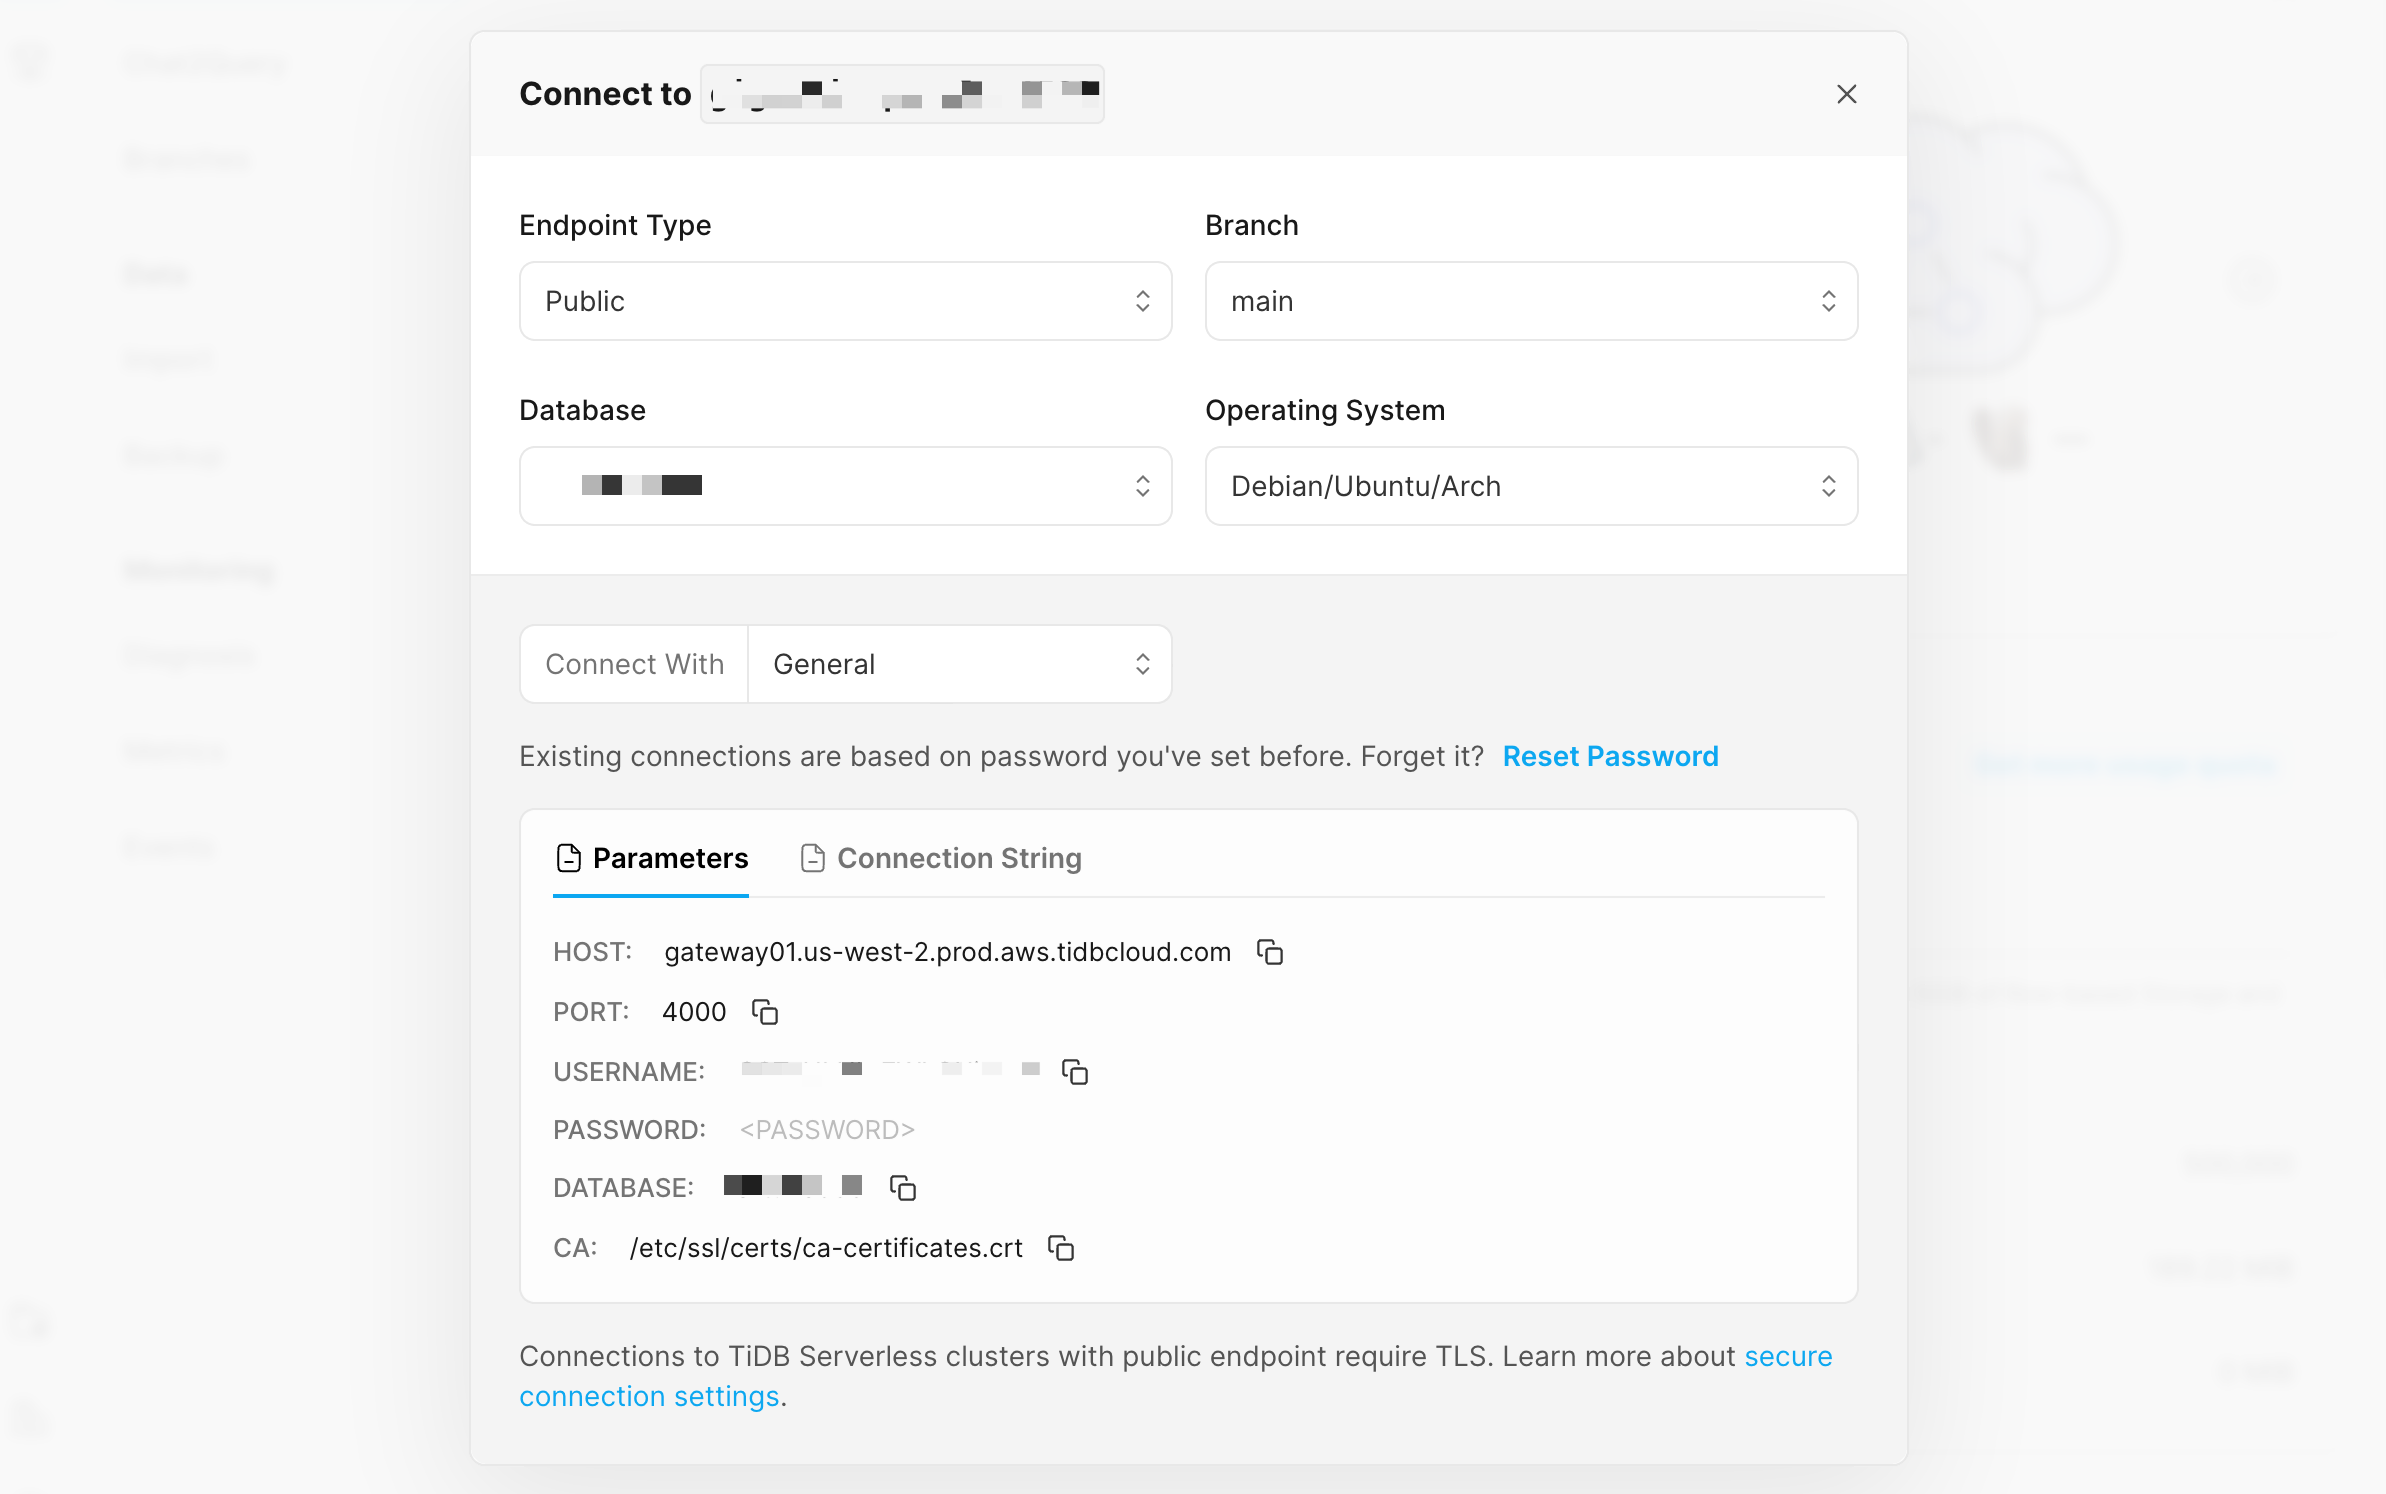
Log into TiDB Serverless, select the cluster you just created. In the Overview tab, select Connect.

-
In the popup, select Endpoint Type as Public, Connect with as General and Operating System as Debian/Ubuntu/Arch. Make a note of the following connection information:
HOST, PORT, USER, PASSWORD and CA.
-
Switch to the Chat2Query tab in the same cluster and run this SQL query to create a new database which Wordpress will use. Let’s name it
test_db.CREATE DATABASE test_db; -
Create a
db_config.ymlfile in the same folder next to your Dockerfile. And fill in the values you noted above. We will use Copilot to create a couple of secure strings in the AWS SSM Parameter Store for your application.db_host: test: your cluster HOST db_port: test: your cluster PORT db_name: test: test_db db_user: test: your cluster USER db_password: test: your cluster PASSWORD -
Initialize and push the secure strings using the
db_config.yml.copilot secret init --cli-input-yaml ./db_config.yml --overwrite
This will create a new secure string in the AWS SSM Parameter Store. You can check it out in the AWS Console.
Customize the Copilot service manifest
The Copilot service we just created will become Task Definitions for AWS ECS. We need to customize it to make the container be able to correctly connect to the TiDB Cloud Serverless cluster, store Wordpress static assets (themes, plugins and some configuration files) persistantly on Amazon EFS and enable Load Balancer and Autoscaling.
You can skip this section if you have cloned the project repository and just use the
copilot/fe/manifest.ymlfile in it directly.
-
Use your preferred code editor, for the purpose of this guide we will just use Visual Studio Code to open
copilot/fe/manifest.yml. -
Find the
variablessection. We need to configure some Bitnami Wordpress image environment variables for the database connection. And you can also set as as blog name and description. Learn more about these variables.variables: # Must for database connection WORDPRESS_ENABLE_DATABASE_SSL: yes # What you copied from TiDB Serverless portal as CA WORDPRESS_DATABASE_SSL_CA_FILE: "/etc/ssl/certs/ca-certificates.crt" # Optional for customizations BITNAMI_DEBUG: true WORDPRESS_SKIP_BOOTSTRAP: yes WORDPRESS_BLOG_NAME: Yet Another Fancy BlogThe
WORDPRESS_ENABLE_DATABASE_SSLandWORDPRESS_DATABASE_SSL_CA_FILEmust be set to connect to the TiDB Serverless cluster publicly via TLS which is enforced as security practices. TheWORDPRESS_DATABASE_SSL_CA_FILEis the CA path you noted previously in the TiDB Serverless cluster connection settings. -
Uncomment the
secretssection and add the following so that Wordpress can retrieve the database connection information from AWS SSM via environment variables.secrets: WORDPRESS_DATABASE_USER: /copilot/${COPILOT_APPLICATION_NAME}/${COPILOT_ENVIRONMENT_NAME}/secrets/db_user WORDPRESS_DATABASE_PASSWORD: /copilot/${COPILOT_APPLICATION_NAME}/${COPILOT_ENVIRONMENT_NAME}/secrets/db_password WORDPRESS_DATABASE_HOST: /copilot/${COPILOT_APPLICATION_NAME}/${COPILOT_ENVIRONMENT_NAME}/secrets/db_host WORDPRESS_DATABASE_PORT_NUMBER: /copilot/${COPILOT_APPLICATION_NAME}/${COPILOT_ENVIRONMENT_NAME}/secrets/db_port WORDPRESS_DATABASE_NAME: /copilot/${COPILOT_APPLICATION_NAME}/${COPILOT_ENVIRONMENT_NAME}/secrets/db_name -
Add the
storagesection in the same file to set up using Amazon EFS. This tells Copilot to create a dedicated sub-directory for your service in the filesystem.storage: volumes: wp-content: path: /bitnami/wordpress read_only: false efs: true -
Modify the
httpsection to the following to add healthcheck configurations. Thestickinesskey is crucial to enable the sticky session for load balancing, so Wordpress redirects work as expected.http: # Requests to this path will be forwarded to your service. # To match all requests you can use the "/" path. path: "/" # You can specify a custom health check path. The default is "/". healthcheck: path: / success_codes: "200-399" interval: 60s timeout: 5s healthy_threshold: 3 unhealthy_threshold: 5 stickiness: true
Don’t forget to save all your changes :).
Deploy your Wordpress container
Now we have set up everything and configured the manifest correctly. Let’s deploy the service to our test environment.
copilot svc deploy --name feDeployment will likely take 5-10 minutes, as the EFS filesystem, ECS service, and Application Load Balancer are created.
Give a dry run!
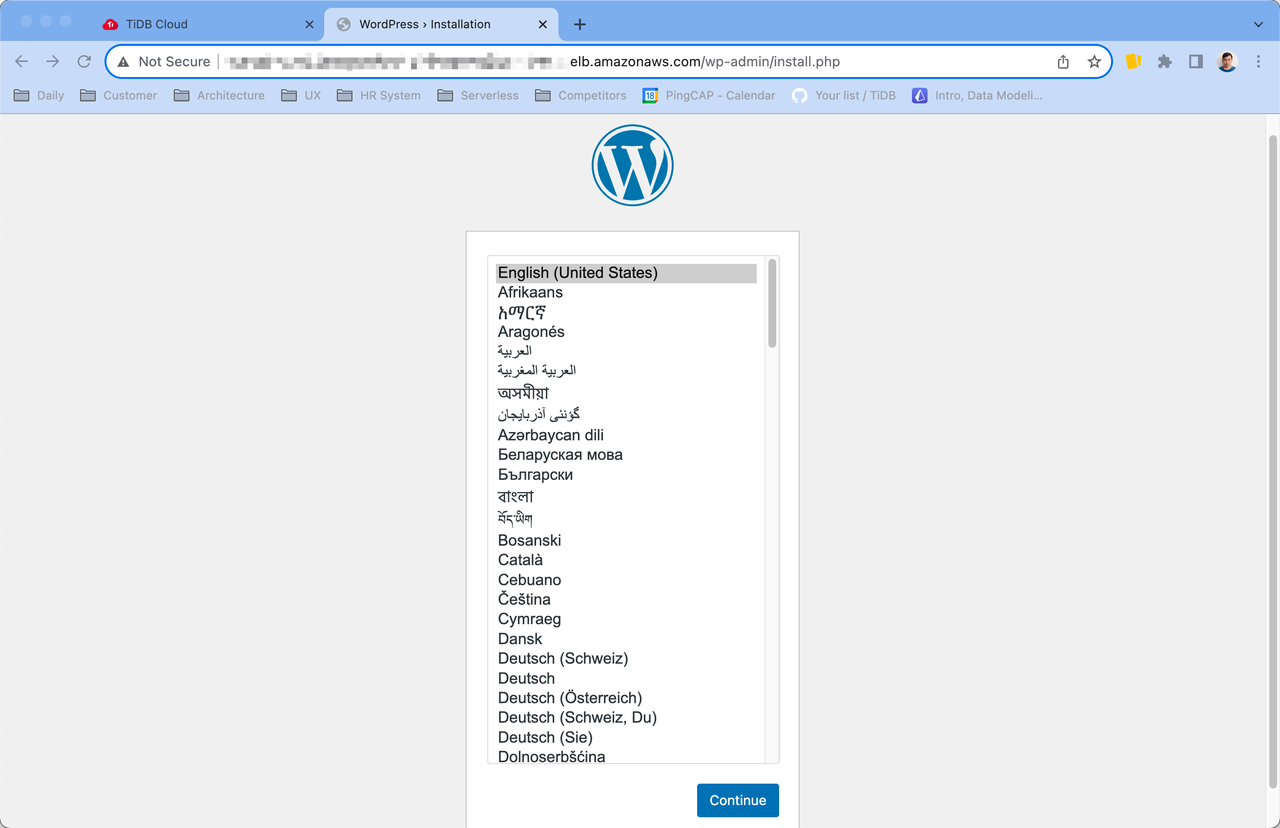
Finally, this is the checking moment! Navigate to the load balancer URL that Copilot outputs after copilot svc deploy finishes to open your fresh new Wordpress site. If you missed that link, you can find it in EC2 > Load balancers > Your wordpress balancer of the AWS Management Console in the DNS name section.
From here, complete the Wordpress install steps as you have done many times and you will have a fully containerized Wordpress up and running.
(Bonus) Use AWS PrivateLink connect to TiDB Serverless
Although for proof-of-concept like this post, it’s handy to connect a public endpoint database. For production, put your database as a private endpoint within the VPC is always a highly recommended best practice to secure your data and the service.
TiDB Serverless supports private endpoint exposure via AWS PrivateLink.
To use it together with the AWS Copilot CLI. Here are some key steps.
Acquire AWS PrivateLink service information
-
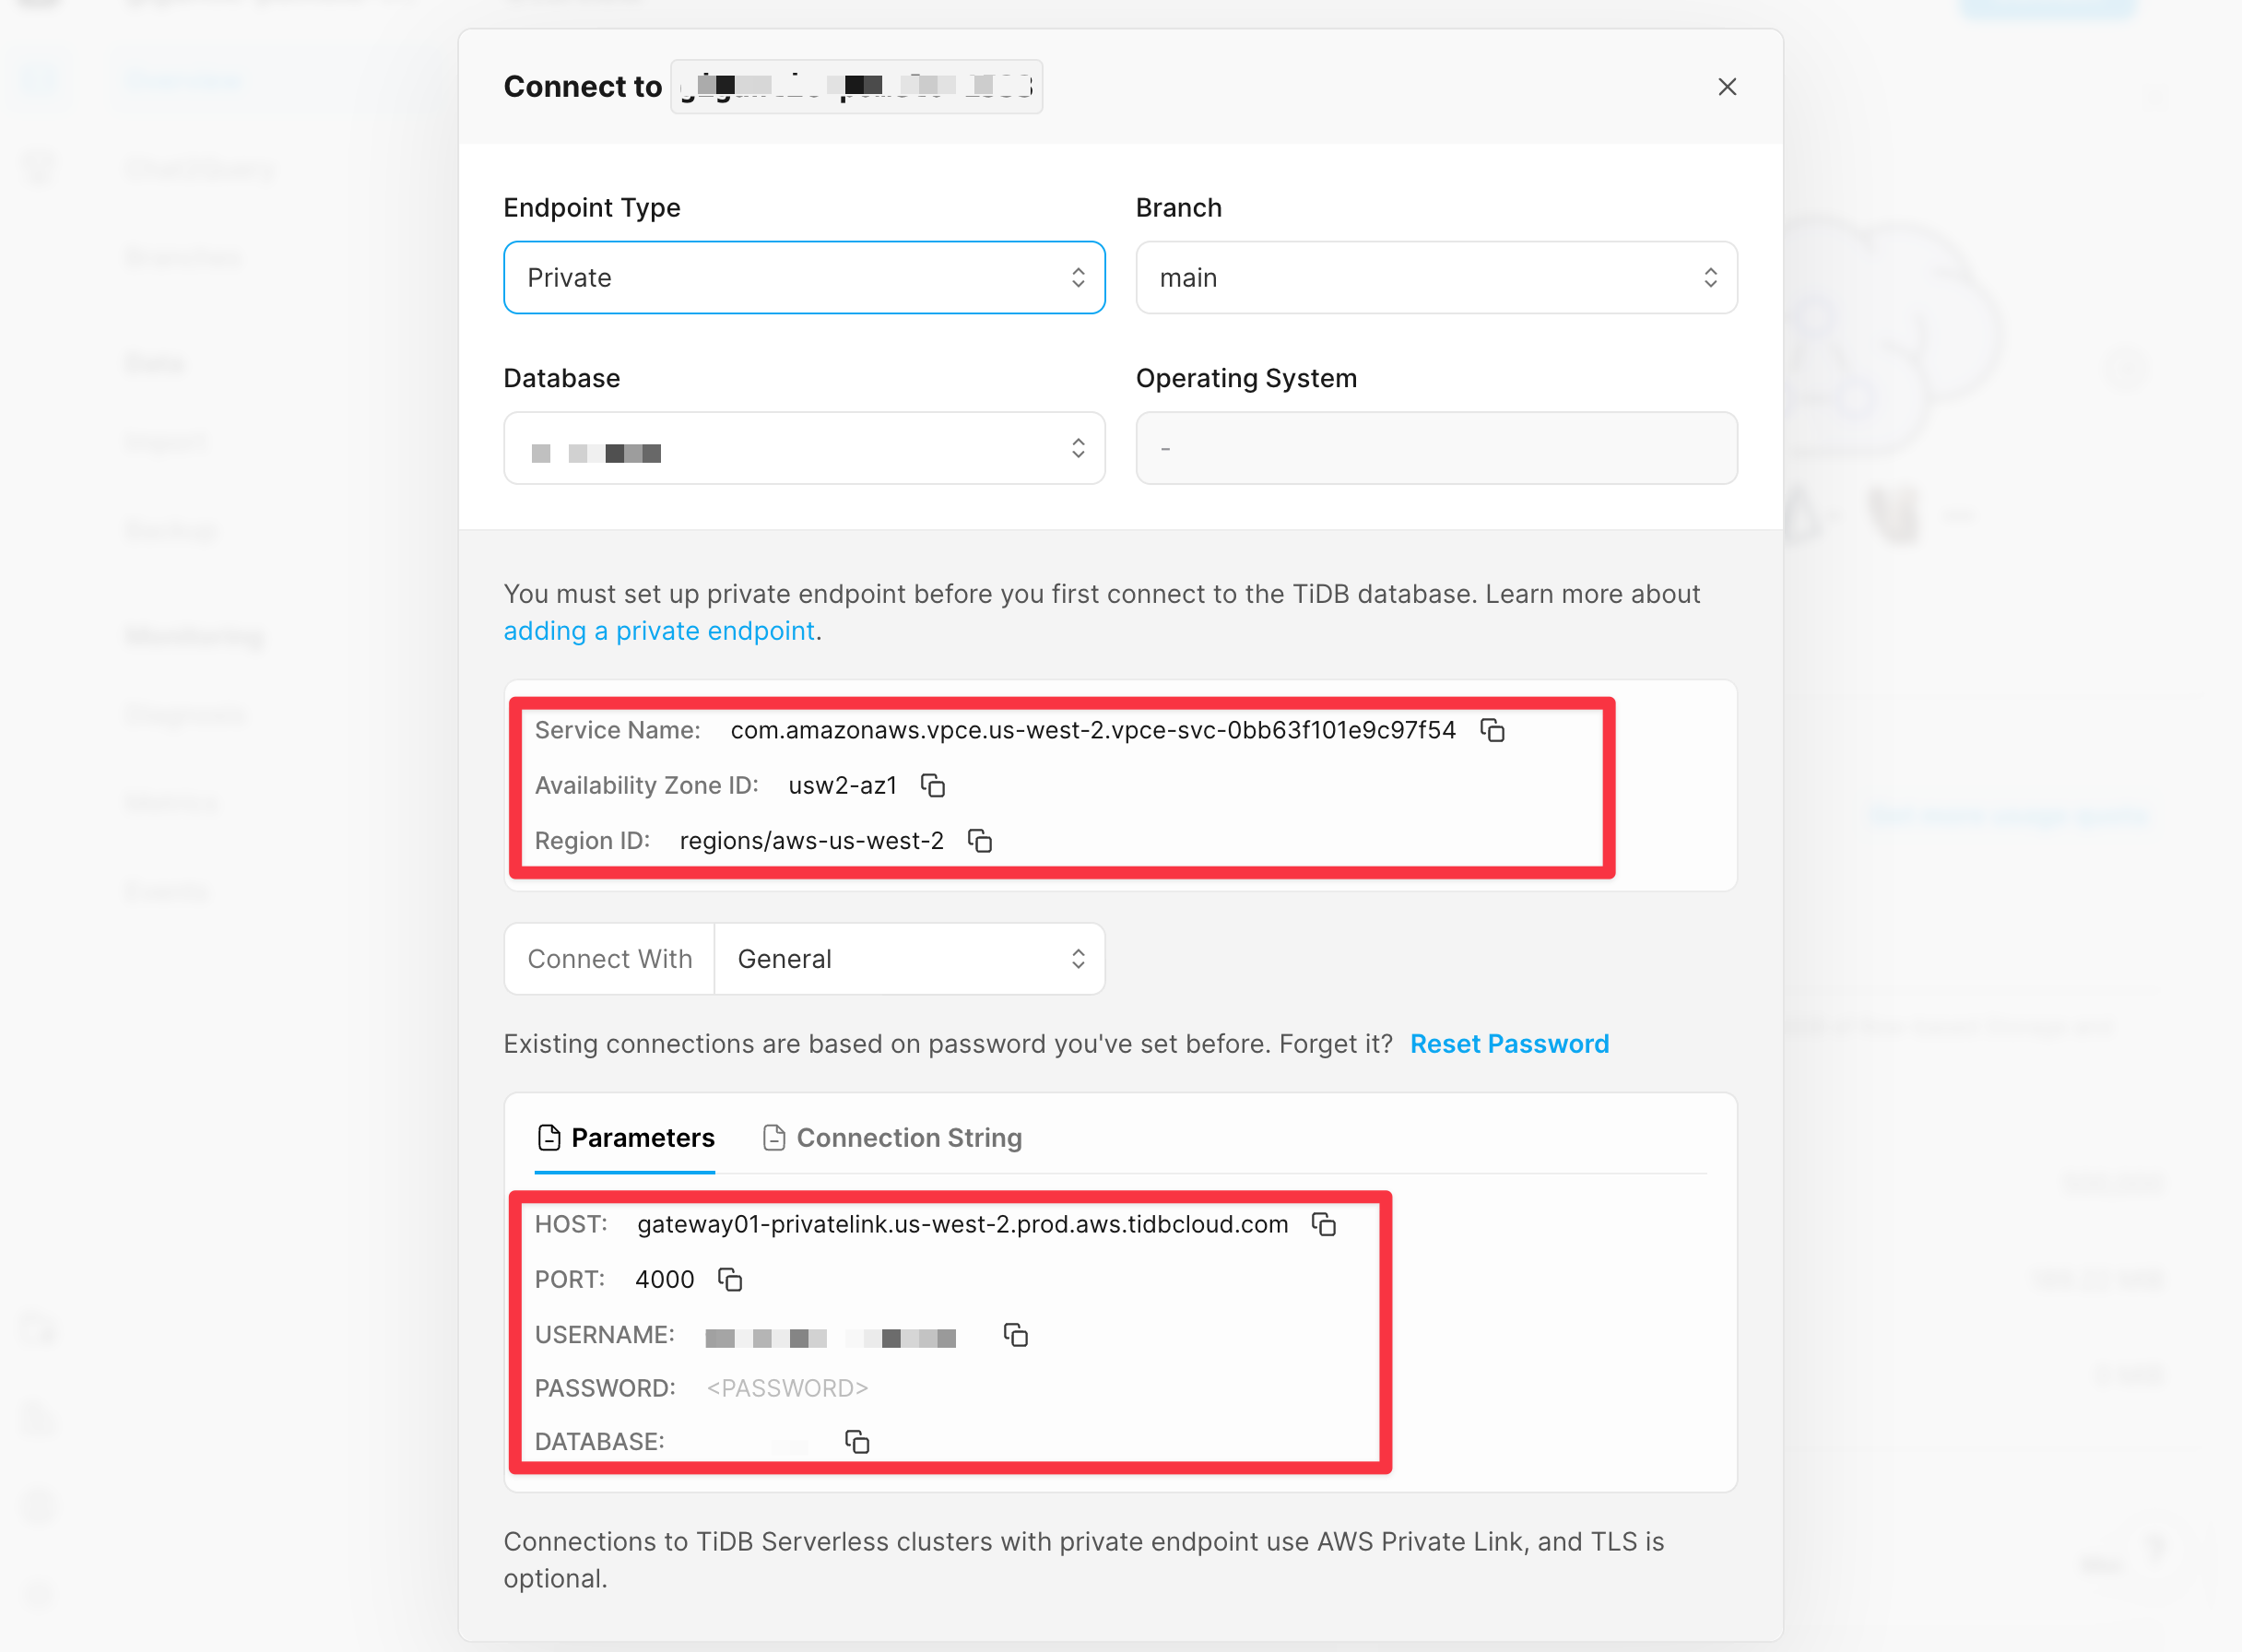
In the Overview tab of your TiDB Serverless cluster, select Connect.
-
Select Endpoint Type for Private, note down Service Name, Availability Zone ID and Region ID for later use.
-
Also note down HOST, PORT, USER and PASSWORD.
Create an AWS VPC Endpoint
-
Log into AWS Management Console and go to VPC > Security groups.
-
You need to create two new security groups within the Wordpress VPC to allow inbound access on AWS ECS on port
4000, which is the TiDB Serverless default port. Create your first security group with below configurations:Name: tidb-wordpress-fe Security group name: tidb-wordpress-fe-dbgroup-wp Description: The Security Group for fe to access TiDB serverless wp. VPC: The VPC was created by the copilot Inbound rules: Leave as default (empty) Outbound rules: Leave as default -
Create your second security group with below configurations:
Name: tidb-wordpress-fe Security group name: tidb-wordpress-fe-dbgroup Description: The Security Group for the TiDB Serverless cluster. Inbound rules: Type: Custom TCP Port range: 4000 Source: Custom Value: The above security group you just created. e.g. sg-056d022c86354bc32 Outbound rules: Leave as default -
Navigate to VPC > Endpoints.
-
Select Create endpoint. Use the following configuration to create a new endpoint.
- Service category: Other endpoint services
- Service name: the Service Name you noted from the TiDB Serverless for the private endpoint connection information. And select Verify service. You should see:

- VPC: The VPC was created by the copilot
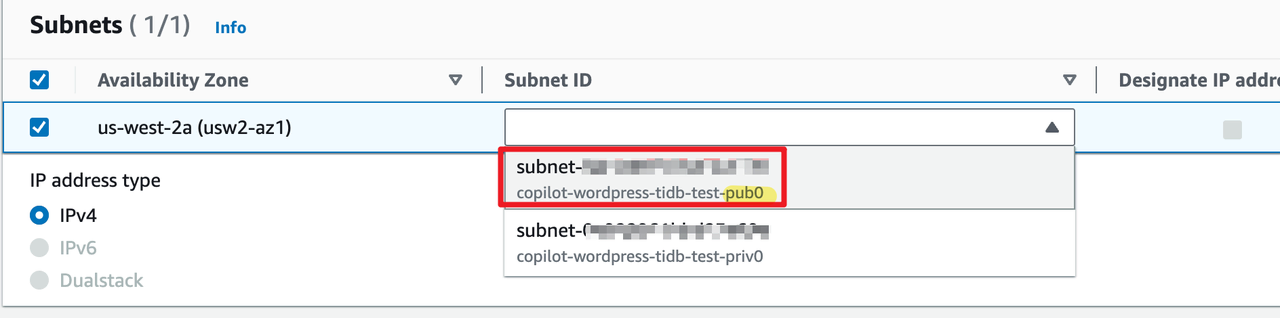
- Subnets: Check the Availability Zone and select the public subnet that was created for Wordpress AWS ECS.
- Security groups: Select the one you just created with Inbound rules as the TiDB Serverless cluster (default: 4000).
Select Create endpoint to finish creating the endpoint.
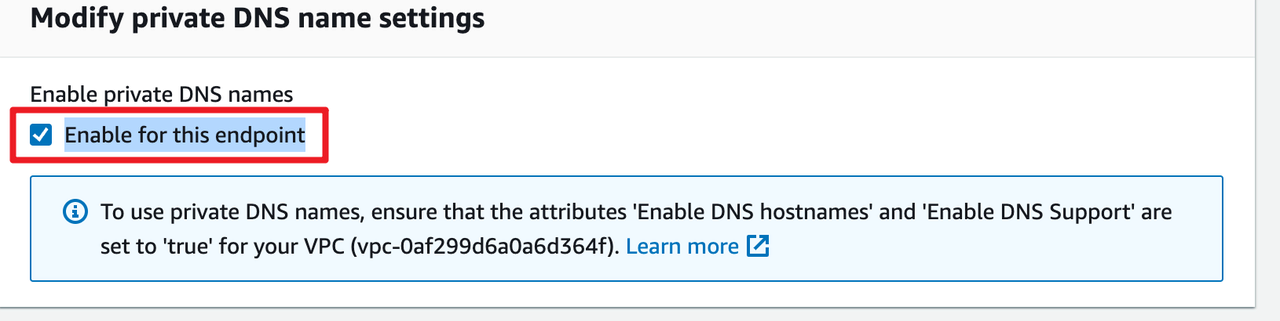
Enable private DNS for the endpoint
-
After you see the status of your endpoint is Available, select Action > Modify private DNS name.
-
Select Enable for this endpoint and select Save changes.
Create new AWS SSM parameters
-
Create a new
db_config_private.ymlfile in the same folder next to your Dockerfile. And fill in the values you noted above for the private endpoint.db_host: test: your cluster host db_port: test: your cluster port db_name: test: test_db db_user: test: your cluster user db_password: test: your cluster password -
Overwrite and push the secure strings using the
db_config_private.yml.copilot secret init --cli-input-yaml ./db_config_private.yml --overwrite -
Refresh the load balancer URL for your Wordpress site and it should work just like using the public endpoint.
Teardown
With Copilot CLI, deleting all provisioned resources on AWS is just one line of code:
copilot app deleteIt normally takes a few minutes to entirely clean up all resources. I found it’s way much easier than you do everything manually in the console or AWS CLI.
For the database on TiDB Cloud Serverless, you can just leave as it is. Or if you really want to wipe every off, drop the database as normal:
Go to the Chat2Query tab in your cluster and run:
DROP DATABASE test_db;Conclusion
This is a lengthy post, but I hope it gives you a good idea with very detailed steps of how to build a containerized Wordpress with AWS ECS and TiDB Serverless. And you can also apply the same approach to other open source SaaS solutions.
What’s next
As I mentioned in the Architecture chapter, there are a few topics I want to cover in my further posts to further make our solution more production ready:
- Add HTTPS support.
- Add backup capability. (Disclosure, with TiDB Serverless, it’s a given).
- Involve DevOps.
And if you have any other thoughts and ideas about this post. Leave me a comment below!